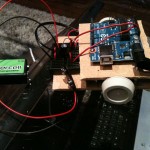
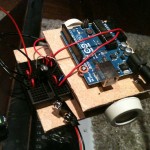
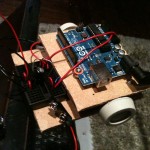
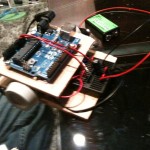
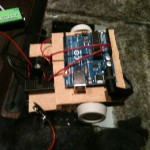
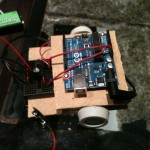
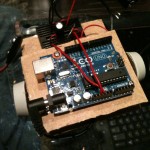
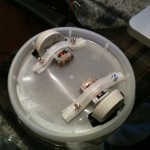
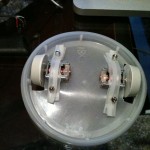
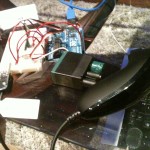
Second attempt. I cut out a piece of hard cardboard (almost plywood consistency) which I found from the back of a old picture frame. Made the mounts for the motors from a sheet of aluminium. I had a set of screws and risers that are used for installing motherboards inside a computer case. I traced out the holes and used the risers to make a platform for the arduino board.
Category Archives: Arduino
Arduino: Wheel Robot (Attempt 1)
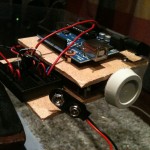
Tried to use a yogurt container top, cut out two slots for the wheels. Use two tiny 5V motors with rubber pads for the wheels. The container top was not regid enough to hold all the components.


Arduino: Ethershield TwitterButton
I combined the push button example and the tweet library example to create a “twitterbutton” which will tweet a message and alert my iphone when a button is pressed. I needed to get a Auth code from Twitter to allow the Arduino to send a tweet. The instructions are straight forward and are on the Tweet Library page. The alerts are sent to the iphone because I “follow” the twitter account front another account and have it set for mobile alerts. All the testing are under Twitter account settings.
Note: Use a 10k resistor as a pull down for the push button (brown, black, orange, gold).
You will need to get the Twitter Library 1.2.2 and put them in the ~/Documents/Arduino/libraries (Mac) or My Documents\Arduino\libraries\ (Windows). Also, you will need EthernetDNS library and put them in the same folder. Arduino Playground Reference TwitterLibrary.

Arduino: Ethershield
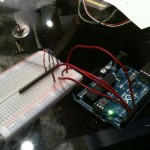
Just got a Arduino Ethernet Shield from ebay. It uses a Wiznet W51000 chip. Its pretty easy to assemble to the Arduino Uno board, you just line up the pins and snap it into place. I also used the Webserver example to test it. The webserver example display the value of the analog pins A0 to A5 on a webpage.


Arduino: WiiChuck Servo
I used the code from this website to control a 3 wire servo. The todbot blog seems to have lot of projects. The wiring is done pretty much the same way as the WiiChuck before. The Servo pin is connected to D7.
Wii NunChuck
Red – 3.3V
White – Ground
Green – Analog In 4 (A4)
Yellow – Analog In 5 (A5)
Servo
Red – 5V
Black – Ground
White – Digital 7 (D7)
Arduino: WiiChuck
I used the WiiChuck.h library and the WiiChuck example from the same page to get the data from the Wii nun chuck.
white – ground
red – 3.3+v
green – data
yellow – clock
Instead of cutting the wires of the nun-chuck, I used a Wiichuck Adapter from FunGizmos. It makes it easy to connect the nun-chuck to the breadboard. The data collected can be seen in the serial monitor for the Arduino software or can be displayed using a Processing software example of a RGB cube. All of this can be found on the WiiChuckClass section in Arduino Playground.
WiiChuck.h, WiiChuck.pde, WiiChuck-RGBCube

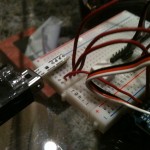
Arduino: Controlling a 3 wire Servo with Potentiometer
Used a 10k POT to control the 3 wire Vex servo. The two end pins of the POT went to 5V and ground. The middle connection of the POT was connected to the analog in 0 (A0). The servo was connected to the 5V (red), ground (black) and digital pin 9 (D9, white). Used the knob example from the Arduino.cc website to program the board. I was also able to print the Analog value of the POT by using the code from the AnalogReadSerial example.
This can be used for steering mechanism.

Arduino: Stepper Motor
Bought a mini stepper motor with 5 wires. Its a Symbol Mini Stepper Motor run on 5V. I tried to use the schematic from this website where someone made a driver to run the motor. For some reason I couldnt get the circuit to work. Most likely it was the transistor or the resistor value. Instead, I tried connecting the motor directly to the pin out 2, 3, 4 and 5. Using the attached sketch file, I was able to run the motor. This motor did full rotation in 20 steps (1step = 18 degrees). Still needs more testing for speed etc. The original .pde file is set to move the motor in random direction and random speed. If you change the .pde file to use constant speed/direction use the following
Speed: 1 – 50 (50 being the fastest)
Direction: 1 – 20 (20 being a complete rotation)

Arduino: Servo
Used a Vex 3 wire servo from VexRobotics. I used a small example code for Arduino called Sweep to see how far the servo can turn. I was happy to find out that it can do 180 degree instead of 100 degree.
(From Vex Robotics)
- Rotation:100 degrees
- Stall Torque:6.5 in-lbs
- Voltage:4.4 – 9.1 Volts (Motor life will be reduced operating outside this range)
- PWM Input:1ms – 2ms will give full reverse to full forward, 1.5ms is neutral
- Black Wire:Ground
- Orange Wire:Power
- White Wire:PWM signal
- Current Draw:20mA to 1.5 A per Servo

Arduino: Clap count
Started with a small project. I had a small audio relay that I purchased as a hobby project a few year back called Mini Vox & Relay. This kit lets you activate a relay when it hears a noise. I lost the microphone that it came with, but fortunately I found one in my box of “things” that worked. I was able to connect the relay to the 5V of the Arduino and the output to Pin 11. The modified the Blink code example and made it count 3 sounds/claps. After 3 counts an LED would turn on.
The problem I ran into was the relay stayed connected as long as the sound. While the relay was connected, the counter kept counting. I had to put a delay after the count so the relay had some time to disconnect to get around this problem. Another way to fix this issue would be to look for a low signal after a high to complete a full count. Â Personal note: Pull Up/Down resistor!
